Creative Applications of Color Temperature
By Stephen A. Dantzig, Psy.D.
Here is an article that I wrote for Rangefinder, but I don’t think it was ever published. Variations of the article along with the images were used in several of my books. Here, though, perhaps for the first time, is the original article:
Color temperature is an often-overlooked factor in photography. Different lights–and even the same light in different situations–have different temperatures. The different temperatures of light will create a particular color cast if your capture medium is not set to match the color temperature of your lights. You will have a blue color cast if your light source has a higher color temperature than the capture medium selected and an amber cast for cooler color temperatures. This is generally considered to be a “problem” that needs to be addressed to create “neutral” skin tones. Creating a “custom” white balance solves most of these problems with digital capture. Photographing a white or gray card under the lighting conditions that will illuminate your subject creates a custom white balance. The custom white balance will neutralize any color cast issues created by color temperature concerns. Check the manual for your camera to learn how to set custom the white balance and remember to create a new custom balance when you change lighting schemes.
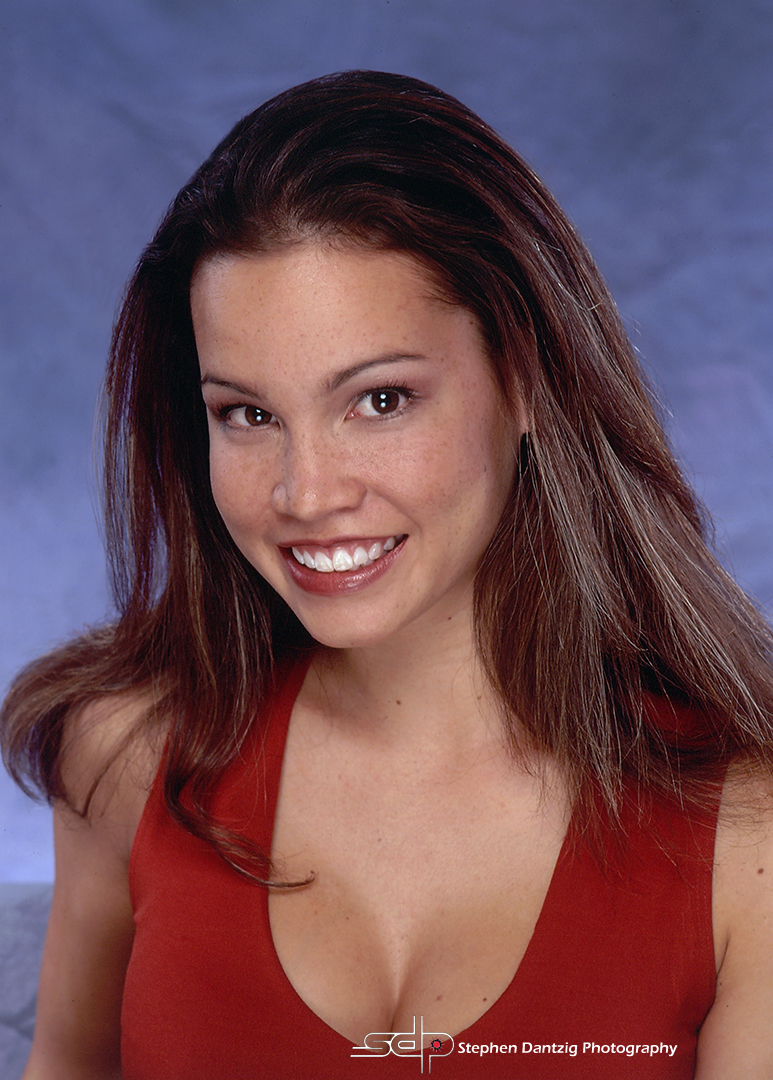
However, understanding the nature of color temperature issues can open a world of opportunities for the creative photographer. We will start with two images of Sanna. Both of the images used a Photoflex Large LiteDome softbox fitted with a CircleMask [for round catch lights] for the main light. The light was positioned directly in front of Sanna, raised high and angled down towards her face. A large silver card reflector acted as a fill source and her hair was lit with two StripDomes. The first image was shot on daylight transparency film with ungelled daylight balanced strobes, yielding a neutral beauty photograph of a very pretty lady.
The image certainly works for many possible uses, but some simple changes can create a vastly different look. It was time to dig out the tool box and play! First we changed films and loaded a roll of Kodak tungsten transparency film. The daylight strobes are at a much higher color temperature than the neutral rendering point of the tungsten film. Higher color temperature lights, when coupled with a capture medium set for lower color temperature will yield a cool or bluish color shift.
However, we have the tools needed to selectively change the color temperature of specific lights on the set to create the look you want. I taped a “Full” Color Temperature Orange [CTO] gel inside the softbox that was illuminating her face [don’t forget to re-meter because the gel will “eat” some light]. I left both hair lights and the background light ungelled. The Full CTO gel brought the color temperature of the main light down to approximate the NRP of the Kodak 64T film. The result was initially overly warm skin tones on Sanna’s face, because a Full CTO gel actually brings the color temperature of a daylight source lower than the tungsten film’s theoretical NRP of 3,200 degrees Kelvin. I adjusted the image using the 82 series “photo filter” and a layer mask in Photoshop CS to get the desired skin tones. A similar effect could have been achieved by shooting a daylight setting and leaving the main light ungelled and placing Full CTBs on all the other lights.

Two distinctly different looks of Sanna were created simply by playing with the color temperatures of the light sources. The left hair light was moved slightly to spill onto Sanna’s cheek, but the lighting schemes were basically the same. Kodak daylight and tungsten transparency films were used. Sanna’s hair and make-up was done by Starr.
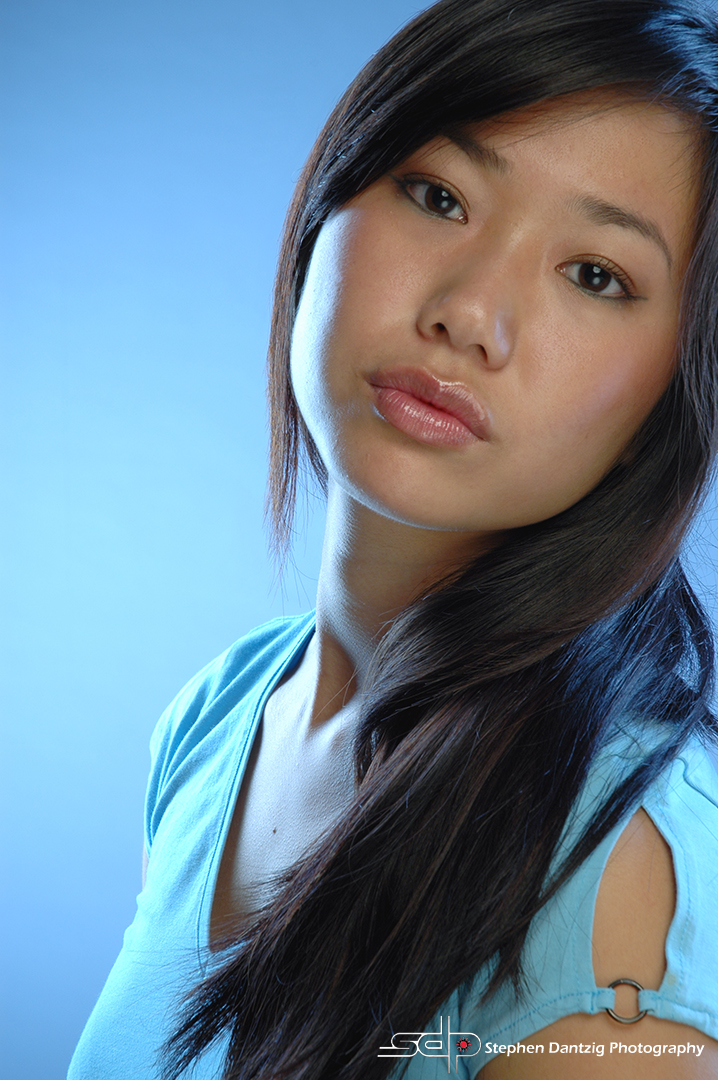
The technique is even easier with digital capture. Do NOT create a custom white balance! Rather, set the camera’s white balance on tungsten [or incandescent, or 3,200 K] and use the same set-up just described. However, I learned that a Full CTO was too much, so I added a 1/8 CTB (Color Temperature Blue) gel to the main light to create the image of Christine. There was no need for adjustments in Photoshop.
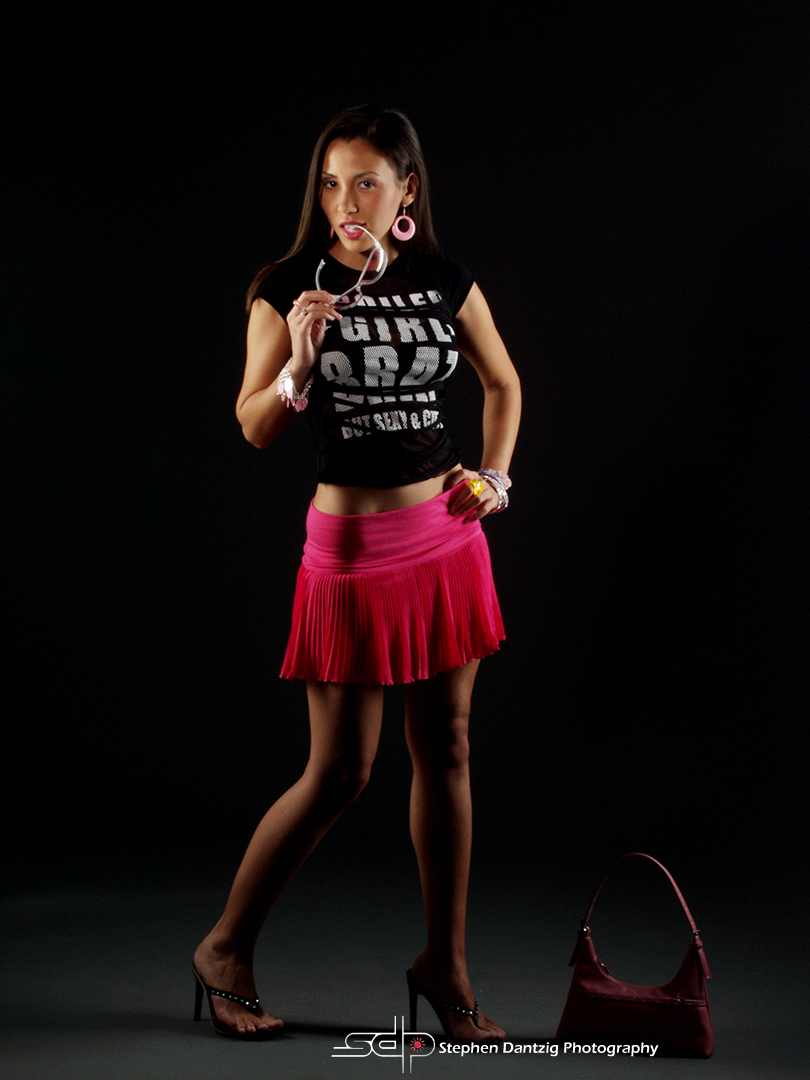
A ¼ CTO was added to a spotlight acting as a fill source for Monica’s humorous take on 80’s fashions. The main lights were two StripDomes placed on either side of Monica and were left without gels. The white balance was set to daylight/flash mode so the color temperature for most of the set was “in balance.” The ¼ CTO on the fill adds just a hint of amber to change the overall impact of the image.
The reverse technique can be used to add some additional visual interest to executive portraits. Tom was photographed on daylight transparency film where a 1/4 CTB gel was placed on the “kicker” light to raise the temperature of that light. A “kicker” or hair light with a different color temperature adds “environmental” contrast as well as highlights and draws the viewer’s eye around more effectively than a neutral source.

You can selectively change the color temperature of natural light as well. A gold reflector was used to bounce the light that was streaming in through the latticework on the porch of a friend’s house into Bella’s face.

The gold reflector adds a golden hue to the light, but it also lowers the color temperature of the bounced light, adding to the warm tones around Bella’s face.